Saturday, May 23, 2015

Check all check boxes javascript

<table>
<thead>
    <tr>
<th><input id="check_all" class="formcontrol" type="checkbox"/></th>
            </tr>
 </thead>
  <tbody>
<tr>
<td><input class="case" type="checkbox"/></td>
</tr>
  </tbody>
</table>

<script type="text/javaScript">
//to check all checkboxes
$(document).on('change','#check_all',function(){ $('input[class=case]:checkbox').prop("checked", $(this).is(':checked')); });
</script>

Wednesday, May 13, 2015

Incorrect integer value: '' for column 'id' at row 1

If  mysql code is ok ( example id column increment and not need to assign any value)  then try this

Edit the my.cnf (my.ini --- in windows file can be found in program file folder where mysql installed) file  and find and comment out the line:
#sql-mode="STRICT_TRANS_TABLES,NO_AUTO_CREATE_USER,NO_ENGINE_SUBSTITUTION"

Just remove "STRICT_TRANS_TABLES,"  and it looks like
sql-mode="NO_AUTO_CREATE_USER,NO_ENGINE_SUBSTITUTION"

Not forget to restart mysql server.
This is the final solution for fixing this error.

Tuesday, May 12, 2015

Deny access to phpmyadmin remotely / control folder access via httpd.conf

Control any folder via httpd.conf which is a file under apache/conf  folder.

Restrict  phpmyadmin remote use and only use in localhost

<directory "c:/apache24/htdocs/phpmyadmin">
order deny,allow
deny from all
allow from 127.0.0.1
allow from ::1
</directory>

Monday, May 11, 2015

How to Install Apache 2.4, PHP5./5.6 and Mysql on Windows Server 2008/2012


Downloading all files

Download Apache
We are going to use the unofficial Windows binary from Apache Lounge for windows.  it is provided as a manually install-able ZIP file from www.apachelounge.com/download/  For 64bit download  httpd-2.4.12-win64-VC11 Download and extract the zip and copy it to the root of C:\. This will be C:\Apache24 when it is all done.
Download windows Visual C++ Re-distributable 
Download PHP
Download php-5.X.X-Win32-VC11-x64.zip Thread Safe from http://windows.php.net/download/ . Extract and rename folder to php and move to C:\.
Note : Thread Safe for Apache and non thread safe for IIS
Edit Apache’s config file, c:\Apache24\conf\httpd.conf and add the following lines to the bottom of the file.
LoadModule php5_module "c:/php/php5apache2_4.dll"
AddHandler application/x-httpd-php .php
# configure the path to php.ini
PHPIniDir "C:/php"
While we are at it we can add index.php to Apache’s list just incase we want to have a starting page as php.
Find Directory index and add index.php
DirectoryIndex index.html index.php
Install Apache Service
Now let’s install Apache as a service. Open a command prompt and type.
c:\apache24\bin\httpd -k install
If do not want Apache starting automatically at start-up/reboot:
GUI Way
START | RUN
Type in services.msc, hit Enter or click OK
Locate Apache2 service and double-click (or right-click for Properties)
Find the caption Startup type: (in the middle of the dialog box), use the pull-down and select Manual
Click OK
PHP Edits
Now we have to do a few edits to the php.ini file to tell it to load support for mysql and the location for the extensions. Since there is not a already set php.ini file we need to rename one of the two examples to php.ini.
Rename c:\php\php.ini-development to php.ini
Now let’s edit php.ini
Uncomment extension directory.
; Directory in which the loadable extensions (modules) reside.
; http://php.net/extension-dir
; extension_dir = "./"
; On windows:
extension_dir = "ext"

Uncomment mysql modules
extension=php_mysql.dll
extension=php_mysqli.dll
Save the changes and open a command prompt. Restart Apache to re-read the changes made to PHP.
So now we have Apache running and configured to use php. Lets create a file called info.php, save it and see if Apache parses the info correctly to display the results.
Open Notepad or your favorite Windows editor and type and save the following.
 <?php
phpinfo();
?>
Open your browser and type, localhost/info.php for the location and you should receive alot of information about PHP.
MySQL
Download and install mysql-5.6.19-win64.msi. Change installation directory to C:\MySQL\MySQL Server 5.6 instead of Program files as there could be permissions issues. Once the installation is completed you can let the configuration wizard run and setup the database server. The defaults will work just fine, but remember what you set the password to for root.
PHPMyAdmin
PHPMyAdmin is a very nice tool to use for administering your MySQL installation.
Download and install phpmyadmin-3.4.10.1-english.zip.
Extract the file and move to c:\apache24\htdocs. Rename directory to phpmyadmin.
Create a config directory under phpmyadmin. Open a browser and type localhost/phpmyadmin/setup/index.php to complete the installation.


Some Common command line command windows

There are some very common command line command we need to install apache,php,mysql

Change directory  to back like
c:\user\Administrator

c:\user\Administrator>cd\
Result
c:\>

Change Drive  to  E write drive letter and hit enter
c:\>E:
Result
e:\>

Enter folder write cd folderName hit enter
c:\>cd apache24
Result
c:\apache24>

Testing your installation For apache
c:\apache24>cd bin
c:\apache24\bin\httpd -t

Install  For apache
c:\apache24\bin\httpd -k install
Uninstall  For apache
c:\apache24\bin\httpd -k uninstall
Start / stop /shutdown / restart  For apache
c:\apache24\bin\httpd -k start
c:\apache24\bin\httpd -k stop
c:\apache24\bin\httpd -k shutdown
c:\apache24\bin\httpd -k restart


asdfsadf

Difference between / what is thread safe or non thread safe in PHP

We used to see different binaries for PHP, like non thread or thread safe? What does this mean? What is the difference between these packages?

Thread Safe version should be used if you install PHP as an Apache module, as a Worker MPM (multi-processing model).PHP has to be thread-safe to be able to play ball correctly with Apache!
The Non Thread Safe version should be used if you install PHP as a CGI binary.

Friday, May 8, 2015

Redirect HTTP to HTTPS automatically IIS /Windows server

Firstly need to install URL Rewrite for IIS. It's very easy using Microsoft Web Platform Installer.
URL Rewrite has a GUI to allow you to enter rules within IIS 7; in the background all this does is edit the web.config file of the site. I will show you how to create a rule both ways.
There are 2 ways we can do this
1.GUI
2.Edit the web.config
We prefer to follow GUI 
In the following example we will redirect HTTP to HTTPs using URL Rewrite. You will need the following items completed in order for this to work correctly.
- SSL Certificate for site installed in IIS.
- Site properly installed and configured for SSL (site set up and binding in IIS configured).
- URL Rewrite 2.0 is installed on the sever.

1st way GUI Version

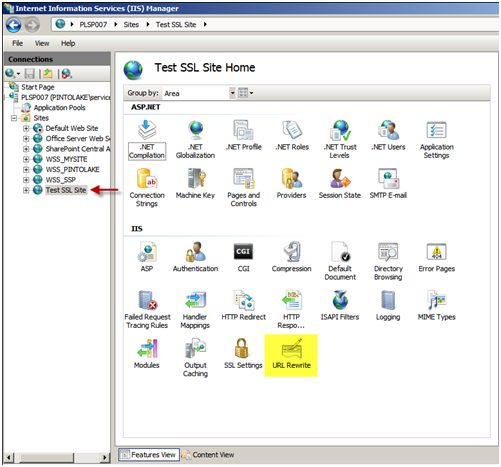
- Select the website you wish to configure
- In the “Features View” panel, double click URL Rewrite
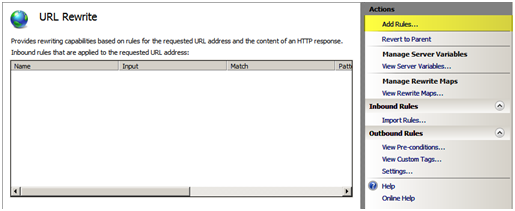
You will notice there are currently no rules configured for this site. Click “Add Rules…” in the Actions menu to the right of the “Features View” panel
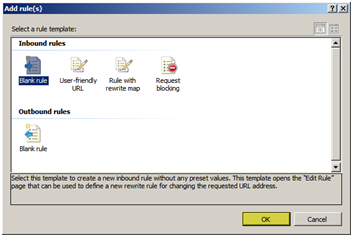
Use the default “Blank rule” and press “OK”.
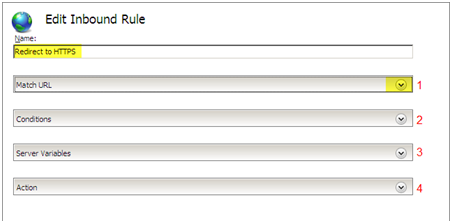
When editing a rule there are the “Name” field and 4 configuration pull down boxes.
- Enter “Redirect to HTTPS” in the name field.
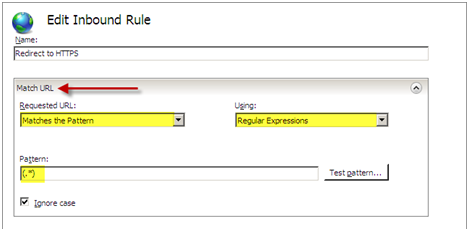
- Next we will configure the first configuration pull down box called “Match URL”, on the right side of “Match URL” press the down arrow to expand the box.
Within the “Match URL” configuration box we will set the following settings:
Requested URL: Matches the Pattern
Using: Regular Expressions
Pattern: (.*)
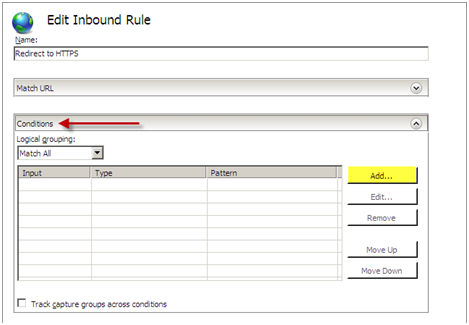
We can now edit the next configuration pull down box which is “Conditions”, Press “Add…” to add a new condition to the configuration.
We will configure the condition with the following settings:
Condition Input: {HTTPS}
Check if input string: Matches the Pattern
Pattern: ^OFF$
Press “OK”
You should see your condition in the list of conditions.
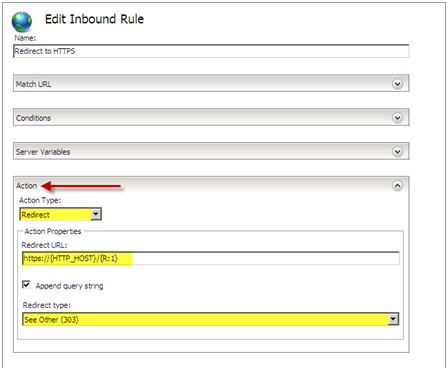
For this setting we do not need to configure the “Server Variables” pull down box. Continue onto the “Action” configuration box and pull down the box by selecting the arrow on the right. We will configure the following settings for the “Action” configuration:
Action Type: Redirect
Redirect URLhttps://{HTTP_HOST}/{R:1}
Redirect Type: See Other (303)
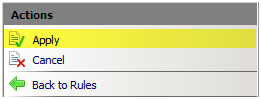
Press “Apply” then press “Back to Rules”
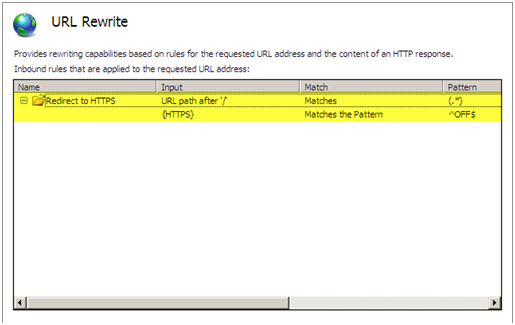
You should now see the rule configured on the main screen of the URL Rewrite module.
Test your site, it should now redirect from HTTP to HTTPS.

2nd way Edit web.config file

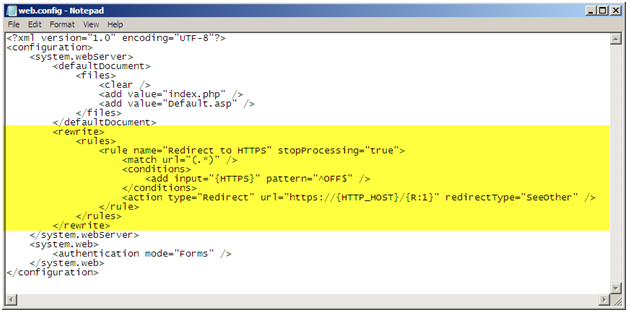
If we exam the web.config file we can see where the rule was entered. If we entered the rule directly into the web.config file it would show up in the GUI.
Web.Config Rule
You can also edit the web.config file of the site directly and you will be able to see the rule in the GUI. You will need to enter the following within the <system.webServer> </system.webServer> elements.
?
1
2
3
4
5
6
<rule name="Redirect to HTTPS" stopProcessing="true">
<match url="(.*)" />
<conditions><add input="{HTTPS}" pattern="^OFF$" />
</conditions>
<action type="Redirect" url="https://{HTTP_HOST}/{R:1}" redirectType="SeeOther" />
</rule>
When implementing this solution you need to make sure to use relative paths for all references on your page because there is a possibility you will get a warning asking you if you want to display secure and insecure items. For example, if you have a logo on your page and the URL to this logo is http://domain/images/logo.jpg, do not use the whole path because including the http:// will hard code this image to use http and not https. Instead use /images/logo.jpg.


Total Pageviews