Saturday, December 26, 2015

Print variable on top of the page where variable is defined bottom - php

Some time we need to print/echo a variable on the top of the page but that variable need to define after a long code bottom of the page. as we know in PHP all instructions are executed sequentially so we cannot read a variable that hasn't yet been defined. 

We can do it easily using jquery. Example

We need to print a total discount value top of the page 

<p> Total Discount : <span id="demo"></span> USD </p>

But the sum of discount value need to find after a long code 
...............................php  code bla bla bla to find a variable $sum_discount  value..................

Then asign  that value within a jquery 

 <?php    
     echo "<script type='text/javascript'> 
                        document.getElementById('demo').innerHTML = ".$sum_discount.";     
                </script>";
?>

Saturday, October 24, 2015

Skip to execute construct method when certain method called

Sometime we don't need to execute any method / code inside constructor/destructor.
example for codeigniter

class Student
{
public function __construct ()
{

        // we want to skip 2 methods(login and logout) in this 'student' class.
$exception_uris = array(
'student/login', 
'student/logout'
);

//  check called class and method from URL.If  called method are not those login/logout execute code
 
if (in_array(uri_string(), $exception_uris) == FALSE)
   {
 
       if ($this->student_m->loggedin() == FALSE)
      {
redirect('student/login');
}
}    
}
}

Friday, September 11, 2015

isset() VS empty() - which one I'll use!!!!

It depends what you are looking for, if you are just looking to see if it is empty just use empty as it checks whether it is set as well, if you want to know whether something is set or not use isset.
Empty checks if the variable is set and if it is it checks it for null, "", 0, etc
Isset just checks if is it set, it could be anything not null
With empty, the following things are considered empty:
  • "" (an empty string)
  • 0 (0 as an integer)
  • 0.0 (0 as a float)
  • "0" (0 as a string)
  • NULL
  • FALSE
  • array() (an empty array)
  • var $var; (a variable declared, but without a value in a class)

Friday, July 3, 2015

Install PHP on IIS for Windows Server 2012

1. Download PHP

You can get the PHP binaries from http://windows.php.net/download/.
You will need the VC11 x64 non thread safe version in the ZIP format. (For 64 bit windows ) 
You will need the VC11 x86 non thread safe version in the ZIP format. (For 32 bit windows ) 
Note Non Thread Safe is for IIS and thread safe for Apache
[* Note x64 is for testing.not working well.use 32bit php mean VC11 x86 non thread safe ..so if your server/pc 64 bit no problem to use VC11 x86 non thread safe. ]
2. Unpack PHP
Once you have downloaded PHP, un-zip the package to a location of your choice.
The recommended location is c:\php\ 

3. Install the C++ Runtime

PHP is compiled using the Visual Studio Compiler so we must install the C++ Runtime in order for PHP to work.
If you do not do this step, you will get an Error 500 from the fast-cgi module and PHP will not work.
– Browse to http://windows.php.net/.
– On the left side, select the download link for Visual C++ Redistributable for Visual Studio 2012 (link working at time of posting).
– When the page loads click download, and then select the filename with x86 in it,(FOR 32bit) then click next.
– When the page loads click download, and then select the filename with x64 in it,(For 64bit) then click next.
– Run the installer and follow the on screen instructions..
[* Note in 64 bit c++ not work fine. Install both x86 and x64 C++. ]

4. Install the CGI module in IIS

The CGI module is necessary for PHP to run. By default this isn’t installed so we will need to do this before we can proceed.
Depending on the version of Windows you are running the procedure is slightly different, so you will need to choose from one of the two methods below.

Windows Server 2008 and 2008 R2
– Navigate to Start\Control Panel\All Control Panel Items\Administrative Tools and open Server Manager.
– In the left hand side there is a tree of services, navigate to Roles > Web Server (IIS).
– Scroll down until you see Role Services.
– Select Add Role Services.
– Find Application Delevopment and then CGI and select the tickbox.
CGI role for IIS in Windows Server 2008
– Click Next and then Install
– When it has finished, you may need to restart IIS or the computer. Do this if requested.

5. Installing PHP

We that we have the necessary roles we can now install PHP.

– Load up the IIS Manager by going to Control Panel\All Control Panel Items\Administrative Tools and opening Internet Information Services (IIS) Manager.
– In the folder tree on the left select your server, then select the site you want to add PHP to.
– In the icon view, select Handler Mappings.
– On the right, select Add Module Mapping.
– Fill out the fields as below:

Request Path: *.php
Module: FastCgiModule
Executable: d:\php5\php-cgi.exe     Remember to enter the path you un-zipped PHP to.
Name: php5     You can select any name you wish.

– Now click the button Request Restrictions…
– On the Mapping Tab click the check box and then select File.
Default Index File / Default Document
– Click OK twice and the module is now installed.

6. Adding an index file/default document for PHP

An index file/default document is the file that is first called automatically when you visit a folder. For example visiting www.iisunderground.com will automatically invoke index.php from the root folder. We need to tell IIS what we want to use as this file.

– On the left of the IIS Manager, select the site we are working on again to return to the page of icons.
– From here select Default Document.
– On the right click Add.
– In the box, enter index.php
– Click OK and the index file/default document is now added.

7. Configure php.ini

Before test we need to configure the php.ini file.
Rename php-production  file to php.ini 
Open the ‘php.ini’ file in Notepad and configure it as needed. There are a few changes you will need to make to configure PHP for your IIS 7 system:
  • Uncomment and set the key, cgi.force_redirect = 0
  • Uncomment the key, fastcgi.impersonate = 1
  • Uncomment and set the key, extension_dir to the ‘ext’ folder in the path PHP was extracted to Example :  extension_dir = "C:\php\ext"
  •  if need Set the key, date.timezone to the time zone of your server (the URL on the line above this key lists the accepted values).

8. Testing our installation

To make sure the install has worked, we need to create a test PHP file.
– Create a new file in the folder you have stored your websites files in.
– Name it test.php
– Inside it, put the following code:

<?php phpinfo(); ?>

– Save it and then visit the URL to test.php and you should get something like this:
An example of a PHPInfo page

Important Note

There's a fairly good chance you're missing the correct VC++ runtime for the version of PHP you're running.
If you're running PHP 5.5.x you need to ensure the VC++11 runtime is installed:
Make sure you download and install the x86 version (vcredist_x86.exe), PHP on Windows isn't 64 bit yet.
Check If need to display error
http://www.iis.net/learn/application-frameworks/install-and-configure-php-on-iis/improve-php-error-messages-in-iis-7-and-above


Sunday, June 21, 2015

How to do FULL JOIN in MYSQL

MYSQL don't support FULL JOIN. But there is a good trick to do this in easy way.
Follow this code and it's simple.

with two tables t1,t2:
SELECT * FROM  t1  LEFT   JOIN  t2  ON  t1.id=t2.id
UNION
SELECT * FROM  t1 RIGHT  JOIN t2  ON  t1.id=t2.id

See very simple to do!!!!!!!!!!!! 

Saturday, June 20, 2015

Prevent to close browser or change page and show message javascript

Add this script before ending body tag.

<script>
window.onbeforeunload = function (evt) {
 var message = 'Do you want to leave this page?';
if (typeof evt == 'undefined') {
 evt = window.event;

}
 if (evt ) {
   evt.returnValue = message;
 }

    return message;

}
 onClick="return confirm('Do you want to leave this page?');"

</script>

Thursday, June 11, 2015

Share WAMP/XAMPP/localhost with other computer via cable (php+mysql server localhost for a team)

Setup web development environment for a team(PHP+MYSQL).

1. Connecting PC through cable (It can be done also via WiFi)
2. Assign IP for each PC.


3. Open httpd.conf file under Apache and configure.Add this code inside </Directory> tag
allow different IP which we've been setup.

        Require all granted
   #   onlineoffline tag - don't remove
Order Deny,Allow
   #   Deny from all
        Allow from 192.168.0.10
Allow from 192.168.0.11 
Allow from ::1
Allow from localhost
</Directory>

4. Go to control panel and select Firewall. Click  "allow a program..." left side menu and allow Apache  HTPP Server for Public.

Done. Now run only one WAMP/XAMP and  use/ browse localhost from other connected PC.
that PC install WAMP/XAMP use it's IP Like
http://192.168.0.10/

Done!!!!!!!!!!!!!!!!!

Saturday, May 23, 2015

Check all check boxes javascript

<table>
<thead>
    <tr>
<th><input id="check_all" class="formcontrol" type="checkbox"/></th>
            </tr>
 </thead>
  <tbody>
<tr>
<td><input class="case" type="checkbox"/></td>
</tr>
  </tbody>
</table>

<script type="text/javaScript">
//to check all checkboxes
$(document).on('change','#check_all',function(){ $('input[class=case]:checkbox').prop("checked", $(this).is(':checked')); });
</script>

Wednesday, May 13, 2015

Incorrect integer value: '' for column 'id' at row 1

If  mysql code is ok ( example id column increment and not need to assign any value)  then try this

Edit the my.cnf (my.ini --- in windows file can be found in program file folder where mysql installed) file  and find and comment out the line:
#sql-mode="STRICT_TRANS_TABLES,NO_AUTO_CREATE_USER,NO_ENGINE_SUBSTITUTION"

Just remove "STRICT_TRANS_TABLES,"  and it looks like
sql-mode="NO_AUTO_CREATE_USER,NO_ENGINE_SUBSTITUTION"

Not forget to restart mysql server.
This is the final solution for fixing this error.

Tuesday, May 12, 2015

Deny access to phpmyadmin remotely / control folder access via httpd.conf

Control any folder via httpd.conf which is a file under apache/conf  folder.

Restrict  phpmyadmin remote use and only use in localhost

<directory "c:/apache24/htdocs/phpmyadmin">
order deny,allow
deny from all
allow from 127.0.0.1
allow from ::1
</directory>

Monday, May 11, 2015

How to Install Apache 2.4, PHP5./5.6 and Mysql on Windows Server 2008/2012


Downloading all files

Download Apache
We are going to use the unofficial Windows binary from Apache Lounge for windows.  it is provided as a manually install-able ZIP file from www.apachelounge.com/download/  For 64bit download  httpd-2.4.12-win64-VC11 Download and extract the zip and copy it to the root of C:\. This will be C:\Apache24 when it is all done.
Download windows Visual C++ Re-distributable 
Download PHP
Download php-5.X.X-Win32-VC11-x64.zip Thread Safe from http://windows.php.net/download/ . Extract and rename folder to php and move to C:\.
Note : Thread Safe for Apache and non thread safe for IIS
Edit Apache’s config file, c:\Apache24\conf\httpd.conf and add the following lines to the bottom of the file.
LoadModule php5_module "c:/php/php5apache2_4.dll"
AddHandler application/x-httpd-php .php
# configure the path to php.ini
PHPIniDir "C:/php"
While we are at it we can add index.php to Apache’s list just incase we want to have a starting page as php.
Find Directory index and add index.php
DirectoryIndex index.html index.php
Install Apache Service
Now let’s install Apache as a service. Open a command prompt and type.
c:\apache24\bin\httpd -k install
If do not want Apache starting automatically at start-up/reboot:
GUI Way
START | RUN
Type in services.msc, hit Enter or click OK
Locate Apache2 service and double-click (or right-click for Properties)
Find the caption Startup type: (in the middle of the dialog box), use the pull-down and select Manual
Click OK
PHP Edits
Now we have to do a few edits to the php.ini file to tell it to load support for mysql and the location for the extensions. Since there is not a already set php.ini file we need to rename one of the two examples to php.ini.
Rename c:\php\php.ini-development to php.ini
Now let’s edit php.ini
Uncomment extension directory.
; Directory in which the loadable extensions (modules) reside.
; http://php.net/extension-dir
; extension_dir = "./"
; On windows:
extension_dir = "ext"

Uncomment mysql modules
extension=php_mysql.dll
extension=php_mysqli.dll
Save the changes and open a command prompt. Restart Apache to re-read the changes made to PHP.
So now we have Apache running and configured to use php. Lets create a file called info.php, save it and see if Apache parses the info correctly to display the results.
Open Notepad or your favorite Windows editor and type and save the following.
 <?php
phpinfo();
?>
Open your browser and type, localhost/info.php for the location and you should receive alot of information about PHP.
MySQL
Download and install mysql-5.6.19-win64.msi. Change installation directory to C:\MySQL\MySQL Server 5.6 instead of Program files as there could be permissions issues. Once the installation is completed you can let the configuration wizard run and setup the database server. The defaults will work just fine, but remember what you set the password to for root.
PHPMyAdmin
PHPMyAdmin is a very nice tool to use for administering your MySQL installation.
Download and install phpmyadmin-3.4.10.1-english.zip.
Extract the file and move to c:\apache24\htdocs. Rename directory to phpmyadmin.
Create a config directory under phpmyadmin. Open a browser and type localhost/phpmyadmin/setup/index.php to complete the installation.


Some Common command line command windows

There are some very common command line command we need to install apache,php,mysql

Change directory  to back like
c:\user\Administrator

c:\user\Administrator>cd\
Result
c:\>

Change Drive  to  E write drive letter and hit enter
c:\>E:
Result
e:\>

Enter folder write cd folderName hit enter
c:\>cd apache24
Result
c:\apache24>

Testing your installation For apache
c:\apache24>cd bin
c:\apache24\bin\httpd -t

Install  For apache
c:\apache24\bin\httpd -k install
Uninstall  For apache
c:\apache24\bin\httpd -k uninstall
Start / stop /shutdown / restart  For apache
c:\apache24\bin\httpd -k start
c:\apache24\bin\httpd -k stop
c:\apache24\bin\httpd -k shutdown
c:\apache24\bin\httpd -k restart


asdfsadf

Difference between / what is thread safe or non thread safe in PHP

We used to see different binaries for PHP, like non thread or thread safe? What does this mean? What is the difference between these packages?

Thread Safe version should be used if you install PHP as an Apache module, as a Worker MPM (multi-processing model).PHP has to be thread-safe to be able to play ball correctly with Apache!
The Non Thread Safe version should be used if you install PHP as a CGI binary.

Friday, May 8, 2015

Redirect HTTP to HTTPS automatically IIS /Windows server

Firstly need to install URL Rewrite for IIS. It's very easy using Microsoft Web Platform Installer.
URL Rewrite has a GUI to allow you to enter rules within IIS 7; in the background all this does is edit the web.config file of the site. I will show you how to create a rule both ways.
There are 2 ways we can do this
1.GUI
2.Edit the web.config
We prefer to follow GUI 
In the following example we will redirect HTTP to HTTPs using URL Rewrite. You will need the following items completed in order for this to work correctly.
- SSL Certificate for site installed in IIS.
- Site properly installed and configured for SSL (site set up and binding in IIS configured).
- URL Rewrite 2.0 is installed on the sever.

1st way GUI Version

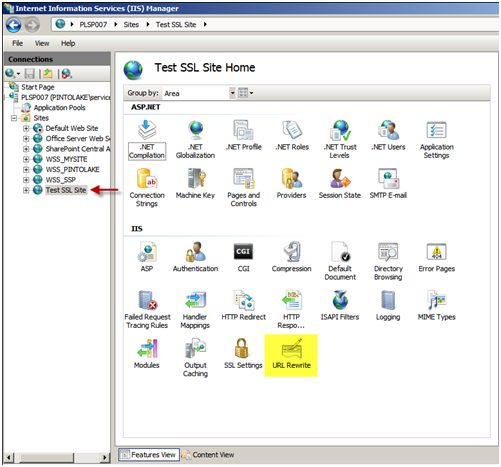
- Select the website you wish to configure
- In the “Features View” panel, double click URL Rewrite
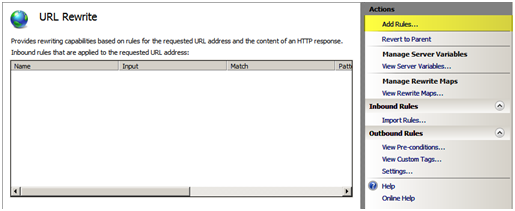
You will notice there are currently no rules configured for this site. Click “Add Rules…” in the Actions menu to the right of the “Features View” panel
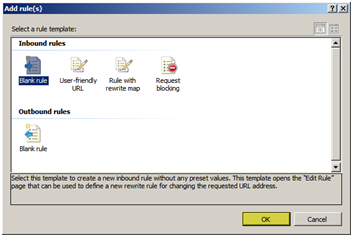
Use the default “Blank rule” and press “OK”.
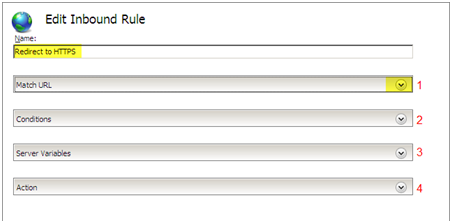
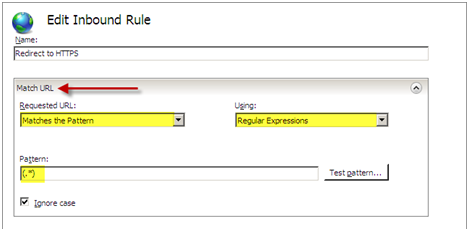
When editing a rule there are the “Name” field and 4 configuration pull down boxes.
- Enter “Redirect to HTTPS” in the name field.
- Next we will configure the first configuration pull down box called “Match URL”, on the right side of “Match URL” press the down arrow to expand the box.
Within the “Match URL” configuration box we will set the following settings:
Requested URL: Matches the Pattern
Using: Regular Expressions
Pattern: (.*)
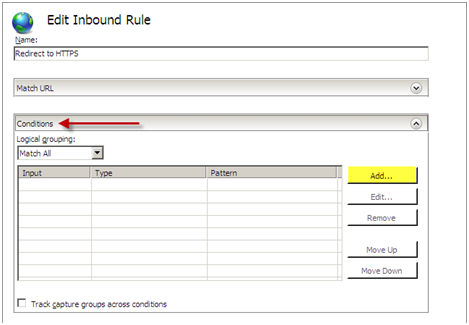
We can now edit the next configuration pull down box which is “Conditions”, Press “Add…” to add a new condition to the configuration.
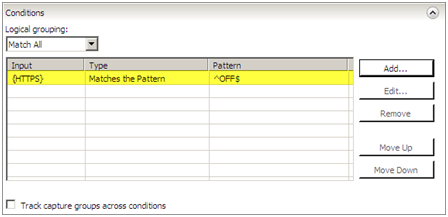
We will configure the condition with the following settings:
Condition Input: {HTTPS}
Check if input string: Matches the Pattern
Pattern: ^OFF$
Press “OK”
You should see your condition in the list of conditions.
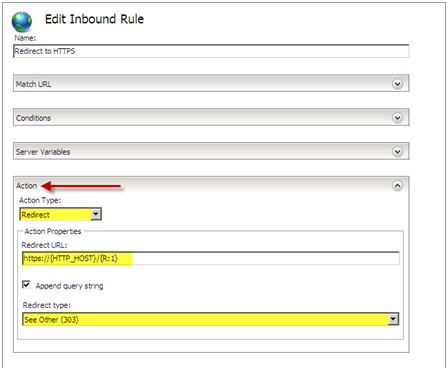
For this setting we do not need to configure the “Server Variables” pull down box. Continue onto the “Action” configuration box and pull down the box by selecting the arrow on the right. We will configure the following settings for the “Action” configuration:
Action Type: Redirect
Redirect URLhttps://{HTTP_HOST}/{R:1}
Redirect Type: See Other (303)
Press “Apply” then press “Back to Rules”
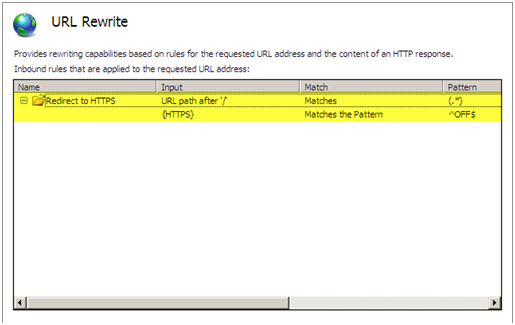
You should now see the rule configured on the main screen of the URL Rewrite module.
Test your site, it should now redirect from HTTP to HTTPS.

2nd way Edit web.config file

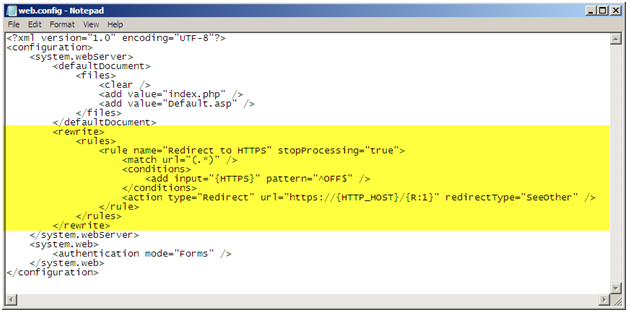
If we exam the web.config file we can see where the rule was entered. If we entered the rule directly into the web.config file it would show up in the GUI.
Web.Config Rule
You can also edit the web.config file of the site directly and you will be able to see the rule in the GUI. You will need to enter the following within the <system.webServer> </system.webServer> elements.
?
1
2
3
4
5
6
<rule name="Redirect to HTTPS" stopProcessing="true">
<match url="(.*)" />
<conditions><add input="{HTTPS}" pattern="^OFF$" />
</conditions>
<action type="Redirect" url="https://{HTTP_HOST}/{R:1}" redirectType="SeeOther" />
</rule>
When implementing this solution you need to make sure to use relative paths for all references on your page because there is a possibility you will get a warning asking you if you want to display secure and insecure items. For example, if you have a logo on your page and the URL to this logo is http://domain/images/logo.jpg, do not use the whole path because including the http:// will hard code this image to use http and not https. Instead use /images/logo.jpg.


Total Pageviews